Showing posts with label Home-Cooked Meals. Show all posts

Monday, March 26, 2012

4 Things it's Easier to Do when You Don't Have a Job

I've never been a stranger to hard work and long hours. It's just how things go in the industry, and most of the time I love it. The trade off, of course, is that it's hard to find time for much of anything else. For a long time that was fine with me because I like what I do, but now I'm beginning to realize that some things are a lot easier when you're not working all the time. For example...


#4. Anything that Might be Crowded on a Weekend

Raise your hand if you enjoy the great outdoors. Now raise your hand if you’d rather enjoy those outdoor activities while surrounded by hundreds of strangers. Now put your hand down, because this is a blog and I can’t see you anyway. Last Monday my lady and I went on a hike in The Pinnacles. The park itself was quiet and secluded, and we probably didn’t see more that two or three other groups during our 6 mile hike along the High Peak Ridge. The views bordered on mind-blowing, and the absence of other hikers surprised me.


 Once we’d finished our hike and returned to the trail head a gentleman there asked us if we would take a short survey. What followed were eight pages of questions about overcrowding in the park: “What’s the longest you would be willing to wait for parking?”, “How many people at the Overlook viewpoint are too many?”, “How jam-packed would this place have to be before you just gave up and tried to hang yourself over a hand-railing with your camera strap?”. We weren’t the only ones sitting at this picnic table taking the survey, and clearly we weren’t the only ones confused by the questions (especially that one about the camera strap). Finally I heard someone else ask The Survey-Slinger (not his actual title) the question we were all thinking. “How busy does this place really get?” Survey Man then told him that, on weekends, you can’t even get a parking spot, so people park several miles away and are shuttled in by the Parks Service, and sometimes certain sections of the trail could have a up to a 15 minute queue. I can’t imagine, I mean, doesn’t that defeat the whole purpose? Why not just go to the mall? We might go back there… on a Wednesday.


#3. Taking as Long as You Want to Make and Eat Lunch

Seriously, I just spent like 20 minutes making a sandwich, and then another 7 minutes deciding what to have with it. (Answer: white wine and Wheat Thins)


#2. Turning down Things You'd Rather Not Do Anyway

Just because I like to drink doesn't mean I always want to spend my wee hours in a bar, or at a party. When you work in the foodservice industry, however, that's what some people think. It was always hard to come up with good excuses to not go out at night with friends or co-workers, without sounding like an octogenarian. If I didn’t want to go, I’d just tell them I had to be home before “Matlock” was on, and save them the trouble of making their own jokes.

Now, today, I’ve got the most airtight excuse in the book: lack of funds. You see, I don’t have a job. It would be irresponsible of me to drive all the way to X to drink a bunch of Y with you and your friend, Z. I mean, I’d like to, but I simply can’t afford it. Anyway, I need to get to bed early so I can be up in time to catch “The Price is Right”.


#1. Braising

Braising is like food magic, it makes everything taste better. If it has one downside, it’s the time it takes. Braising doesn’t exactly lend itself to the weeknight post-work meal, but if you find yourself with the time it’s well worth it. In this recipe, the chicken thighs will be fully cooked after the first 35-40 minutes or so, but it's what happens in the oven after they're done that makes all the difference. The extra hour of cooking means all of the flavors will have time to mingle and become friends, and your chicken will be fall-off-the-bone tender. The other great part, especially if you have the whole day at your leisure, is that you can put the entire dish together in the morning, go enjoy your day, and then pop it into the oven a couple of hours before dinner time. Of course I've made this dish before during the work week, when I was usually coming home late and short on time, and served it as soon as the chicken was fully cooked, but the difference in flavor is night and day.


Braised Chicken with Oranges and Olives:
·         2 Tbsp. olive oil
·         8 chicken thighs
·         3-5 garlic cloves, thinly sliced
·         2 carrots, peeled and sliced 1/4”
·         2 ribs celery, sliced 1/4”
·         1/4 cup chopped yellow onion
·         1 cup sliced cremini mushrooms
·         ¼ cup white wine
·         1 Roma tomato, diced
·         ¼ cup chopped parsley
·         2-3 sprigs thyme
·         1-2 sprigs oregano
·         1 bay leaf
·         1/3 cup very coarsely chopped green olives
·         2 medium navel oranges
·         ½ cup chicken stock
·         salt and pepper

Preheat your oven to 350 degrees. Heat olive oil in a large frying pan over medium-high heat. Season the chicken liberally with salt and pepper, and place skin side down in your pan. Cook for 3-5 minutes, allowing skin to brown, and working in batches if necessary, and then remove them from the pan to a large baking dish.

To the pan, add the3 garlic, carrot, celery, onion, and mushrooms. Season to taste with salt and pepper and cook for 3-5 minutes. Deglaze the pan with white wine, and then add the remaining ingredients. Cook until everything is hot, then add this mixture to the baking dish, over the top of the chicken thighs (at this point the mixture can be cooled and refrigerated until ready to bake, if desired).
Place the baking dish in the oven and bake for 1 hour, then reduce the oven temperature to 250 degrees and cook for 1 additional hour. Serve in a bowl over rice or with a thick slice of bread to soak up the braising liquid.

Thursday, February 17, 2011

Love in the Time of Sunchokes

I hadn't done it in some time, not since we moved in together, at least. Valentine's Day seemed like the perfect excuse, and the sunchokes at the market were calling my name anyway.

I don't cook at home often enough, and when I do it's usually not very impressive. I can do incredible things with ramen. Us moving in together was supposed to spur my cooking motivation; "I don't want to make something fancy just for me, but if someone else got to enjoy it too... ", but the hours in the day have a way of getting away from you. She's probably lucky that the Ballard Farmer's Market happened to be on a Sunday.

When I don't know what I want to cook a trip to the market always serves to inspire. It usually only takes one ingredient, and once I see it the menu starts to form in my head. This time it was the sunchokes. Also known as Jerusalem artichokes, these knotty root vegetables look a lot like ginger, and taste something like artichoke flavored potato. They're delicious when peeled and roasted, but I wanted to do something different: something that looked familiar at first, so that their curious flavor would be more pronounced when she tried it. A sauce was the perfect way to go. I still roasted them, but once they were done they went into the blender along with some chicken stock, Greek yogurt, and lemon juice. I'd prepared the whole sauce in my head before I even paid for the little guys, but what to serve it with?

Market pickings can be pretty slim in winter, but the one thing we always have in spades is potatoes: little ones, big ones, red, blue, and pink ones. Cora's always had a love for crispy potatoes, whether in French fry or hashbrown form, and I thought some fried diced potatoes would play nicely with the sauce. The next ingredient that caught my eye at the market was sunflower sprouts. I hadn't worked with them before, but I knew exactly where I wanted them to go. As I stood there staring at the mound of sprouts I mentally took a handful, tossed it with lemon, olive oil, and salt, then pictured myself tasting them with my crispy potatoes and sunchoke sauce. It worked, and now the only thing I was missing was the protein. My original thought was a game hen, but once I got to the grocery store I saw some beautiful pieces of sockeye salmon. This was pure luck, as it reminded me that we'd been sitting on a bottle of rosé we'd picked up on one of our trips... a bottle we'd bought and held onto specifically to pair with salmon someday. I closed my eyes and seared the salmon in my mind, then put it on top of my potatoes and sauce, under my sunflower sprouts. I paid and headed home with high hopes that the food I was about to prepare would be as delicious on the plate as it was in my head.

I got home and moved all the furniture out of the living room. I dragged the dining table into the center, tied a big red bow around it and put a bouquet of roses in the middle. Then I filled the living room with pink balloons and lit every candle I could find. I put on a shirt, a vest, a tie, and laid out a dress for Cora. I made sure to have appetizers out: hummus, tabbouleh, tomato salad, toasted pita, and marinated olives. I opened a bottle of champagne.

When she got home and came in the kitchen she knew something was up. Maybe it was the appetizers and soft music, or maybe she realized that I don't often cook in my Sunday best. Either way, she was definitely surprised when she walked into the living room to see that I'd converted it into our own private restaurant for the evening. So I sent her away to don her evening attire and got started on dinner. We shared our appetizers in the kitchen while I cooked and she talked about her day, and her excitement was obvious as she took pictures of everything from the table to the food to the balloons to me cooking. I finished the fish and plated the food, and we adjourned to our candle-lit living room.

Nothing gets my ego going quite like those moments when my food comes out just like I'd pictured it, and this was definitely one of those times. The salmon was cooked perfectly. The potatoes were crispy on the outside, browned along their edges, and soft like mash on the inside. The sauce was flawlessly smooth and creamy not unlike a good bechamel, with the yogurt making it thick and firm on the plate yet light and fluffy on the tongue. The sunflower sprouts were crunchy with a slight peppery flavor, and that along with the lemon juice balanced out the sweeter richer flavors of salmon, potato, and sunchoke. She loved it. I loved it. I'd totally nailed it.

Seared Salmon with Crispy Potatoes and Sunchoke Puree

Sunchoke Sauce
  • 1/2 lb sunchokes, peeled and cut into 1" chunks
  • 1 Tbsp Canola oil
  • 1/3 - 1/2 cup chicken stock
  • 1/4 cup Greek yogurt
  • 1 Tbsp lemon juice
  • salt and white pepper to taste
Potatoes
  • 2 cups potatoes, diced (if you can't find multi-colored potatoes then use Yukon golds)
  • 1/4 cup Canola oil
  • salt and pepper to taste
Salmon
  • 1 lb fresh sockeye salmon, pin bones removed
  • 2 Tbsp Canola oil
  • salt and pepper to taste
Sunflower Sprout Salad
  • 1 cup sunflower sprouts (or substitute other hearty sprouts or micro-greens)
  • 1/4 cup parsley, coarsely chopped
  • 1 Tbsp extra virgin olive oil
  • 1 Tbsp fresh lemon juice
  • salt to taste
To prepare the sunchoke sauce preheat an oven to 400 degrees. Toss sunchokes with oil, salt, and white pepper then roast until completely soft all the way through, about 40 minutes. Transfer to a blender, add remaining ingredients, and puree until smooth. Set aside. To cook the potatoes preheat a skillet over medium high heat, add 1/4 cup oil and let this preheat as well, about a minute. Add potatoes and cook, stirring regularly until almost cooked through, about 5-10 minutes, depending on size, then turn up to high and cook until the outsides are browned and crispy. Remove from pan with a slotted spoon and keep warm in your oven. In a separate oven-safe pan over medium high heat add 2 Tbsp oil. Season the salmon with salt and pepper and sear flesh side down until it just begins brown. Flip salmon and transfer to the oven to finish cooking, 5 minutes or more depending on thickness. While the salmon is finishing combine sprouts, parsley, lemon juice, and olive oil in a small bowl. Season with salt. To serve pour the sauce onto the plate first (it may need to be re-warmed in a microwave briefly), top with potatoes, followed by the salmon, and finally the sprouts in a small bundle on the very top. Enjoy with wine and the loved one of your choice.

Wednesday, January 5, 2011

Stumpo Sauce

I’m back to the grindstone after a great Christmas break spent with my parents and siblings, my nephew and nieces, and my bro-in-law. I think we all know the holidays aren’t about the gifts or the parties or the excuse to start drinking first thing in the morning; they’re about family and friends, inviting into your home those folks you might not try so hard to see any other time of year, and posting things like “Merry Christmas!” or “Happy New Year!” on the Facebooks of people you’ve probably never spoken to in person. I’m sure we've all found a few messages like this in our notifications or mailboxes (electronic or otherwise) over the course of the last month or two.

This recipe came about from a Facebook message I received written by an old family friend that I have still yet to meet, Phil Stumpo. In fact, up until last month I knew him only by his music and his marinara. My family has been making what we always called “Stumpo Sauce” for as long as I can remember. When I asked my parents for the recipe they provided it from memory. Once upon a time I think it was hand written on a scrap of paper, which now is surely tucked into one of our family's old recipe binders somewhere never to be found again; sacrificed to the recipe gods.

Growing up my family loved to be creative in the kitchen, especially when it came to dinner; we didn't often make the same thing twice unless it was really worth it. There are only a couple handfuls of recipes that stick out in my head from my childhood, so when I got this particular “Merry Christmas” in my mailbox followed by “…have been enjoying your blog” I jumped at the opportunity to ask if I could post the recipe here. I sent what my parents had given me to Phil for fact checking and updating, and what he returned to me is what you see below. It’s a deliciously hearty marinara sauce that goes especially well with your favorite tortellini. I’ve left the recipe essentially in its original form, and added my notes below.

“Stumpo Sauce”
  • 1 pound Italian sausage links sliced 1-2 inch thick
  • 1 pound leanest ground hamburger
  • 2 chicken thighs with skin
  • 3 Tbsp extra virgin olive oil
  • 1 small white onion, chopped
  • 1 celery stalk, diced
  • 1 small carrot, peeled and diced
  • 2 garlic cloves, finely chopped
  • 6 large whole garlic cloves, peeled
  • 2 pounds mushrooms, thick sliced
  • 1 cup Italian parsley
  • 1tsp dried Oregano
  • 6-8 fresh basil leaves, coarsely chopped
  • 1/2 tsp red pepper flakes
  • 1Tbsp ground black pepper
  • 2 cans tomato sauce, 28 oz
  • 1 can diced tomatoes, 28 oz
  • 2 cups red wine
  • 10 oz chicken stock
  • salt to taste
In large preheated sauté pan, add 2 Tbsp oil and sear both thighs skin side down for 4-5 minutes or until skin is dark brown...turn over for another 4-5 minutes, remove and reserve. To remaining oil and drippings add another Tbsp of oil and sauté 6 garlic cloves on all sides until golden brown, being careful not to burn. Remove cloves and reserve. 

Into the pan add diced garlic, carrot, onion, parsley, and celery. Stir until softened then sprinkle with dried oregano, salt, and red and black peppers. Stir together, add sliced sausage and cook until brown, then add crumbled ground beef and stir until it's almost fully cooked. While ground beef is still a bit pink add sliced mushrooms and wine and bring to boil, then reduce heat and let simmer for 10 minutes. 

When liquid has reduced by 1/3, add sauce, tomatoes, and half of the stock, stir and let simmer for 10 minutes. Drop in seared chicken thighs and continue to simmer for 30-40 minutes on low heat, adding stock a little at a time as sauce reduces. At this point, taste sauce for salt and adjust if necessary, then take the six cloves of sautéed garlic you have reserved and smash them into a paste. Incorporate this into the sauce and then add chopped basil and simmer gently until the chicken thighs start to fall apart...that's when you know it's done. (FYI, thighs only there for flavor, or for the chef's enjoyment...not to be served).

Notes:
  • The chicken thighs add a much richer flavor to this sauce then the chicken stock ever could by itself thanks in part to the browned bits that stick to the pan when seared, however since you wont be serving them they could be omitted if desired. (If i remember correctly my parents would use pork chops instead of chicken, and at the end cut them up and stir them back into the sauce. Such is the nature of hand-me-down recipes: evolving as they're passed along.)
  • The step of sauteing whole garlic cloves, reserving them to incorporate at the end, then sauteing more minced garlic to leave in the sauce during cooking may seem unnecessary, but it is certainly not. The minced stuff you leave in lends a subtle background note, while the smashed cloves stirred in at the end give you a brighter "roasted garlic" kind of flavor. Both are important to the sauce.
  • As a rule, never cook with a wine you wouldn't drink, especially when your adding a full two cups to the dish. Its flavor will have a big effect on your finished product. I have found that both Yellow Tail and Barefoot are good brands for these situations. They're easy to drink and wont break the bank.
  • Don't try to hurry the sauce along during the reducing and simmering process; it needs to cook low and slow to reach its maximum potential. Stir occasionally during this time to make sure nothing is burning at the bottom of your pan.

Friday, November 5, 2010

A Quiet Night


When I was growing up every holiday was an event, and Halloween was no exception. My siblings and I would decorate the entire house, carve pumpkins, toast pumpkin seeds, help each other build our costumes, go trick-or-treating, and eventually get sick from eating ridiculous amounts of candy. As I moved into high school and my siblings moved away to live on their own, Halloween morphed into a time to go out with friends, get dressed up, cut loose, cause trouble, and still eventually get sick from eating ridiculous amounts of candy. College wasn’t really much different, except that the “trouble” got more interesting, the parties lasted longer, and the costumes generally got sluttier. 
Which brings us to now. The crazy parties have gone away, and I'm no longer excited by the idea of eating my weight in miniature candy bars. In fact, now that I've got a real life with a real job and a real girlfriend and real rent to pay I can barely be bothered to dress up for the occasion. My concept of "fun" has changed such that now all I really want is a nice relaxing evening at home carving pumpkins and making dinner with my lady.

Herb-brined Chicken, Roasted with Apples and Onions

This is a terrific dish to serve when the weather turns cold and you start craving comfort food. I've brined many a chicken in while working in restaurants, but it's not something I often think of doing at home. The process is deceivingly quick, as long as you make the brine and get your chicken into it the night before (or even that same morning), your actual working time is less than 30 minutes all together. The end result will be the juiciest, most flavorful chicken you've tasted.
Brine
  • 1/2 gal water
  • 1/2 cup Kosher Salt
  • 1/4 cup Sugar
  • 1 bunch Fresh Thyme
  • 3 sprigs Fresh Rosemary
  • 1 Bay Leaf
  • 1 head Garlic, cut in half horizontally
  • 1 small Onion, sliced
  • 2 T Pink Peppercorns
  • 1 ea Lemon, halved
  • 6 ea Chicken Drumsticks
Roasted Chicken
  • Salt and pepper to taste
  • 2 Tbsp Butter, salted
  • 1 Tbsp Vegetable Oil
  • 1 small Yellow Onion, diced
  • 1 Apple, Granny Smith or other firm apple
  • 1 bunch Fresh Thyme
  • 1 ea Lemon, quartered

Combine all ingredients for the brine except the chicken in a sauce pan on high heat and bring to a boil. Stir to dissolve the salt and sugar, then remove from heat. Refrigerate until cool and then add the chicken. Let sit at least 8 hours, or preferably over night. Remove chicken from brine and rinse well, then pat dry. Preheat oven to 400 degrees. 
In a cast iron pan over medium high heat add the butter. Once the butter has melted add onions and cook until soft, about 5 minutes. Add the apples, thyme, and lemon. Stir together and cook about 2 minutes, then place all ingredients in a casserole dish. Return the pan to heat and the vegetable oil. Sprinkle chicken drumsticks with salt and pepper then brown each side, 1-2 minutes per side. Remove from pan and place in casserole dish with the apple onion mixture. Place dish in the oven and cook for 20-30 minutes, or until a thermometer registers 160 degrees.

Tarragon Mashed Potatoes
I served the roasted chicken with these mashed potatoes. I've made them plenty of times in one form or another, but this is the first time I've actually written down a recipe for it. I make mashed potatoes without measuring (adding ingredients to taste) and I encourage you to do the same, but this recipe should serve as a good guide. If you've got other herbs around to use besides tarragon then use them.

  • 2 Russet Potatoes, peeled and cut into 1” pieces
  • 2 Tbsp Sour Cream
  • 1/4 cup Butter, salted
  • 1/4 cup Whole Milk
  • 1/4 cup Fresh Tarragon, chopped
  • Salt and Pepper to taste

Simmer potatoes in heavily salter water until they yield easily to a fork. Drain well and return potatoes to the pot, add remaining ingredients and mash together until smooth.

Thursday, February 25, 2010

The Delicious Dozen

I've always believed that the best times in life occur when good friends and great food are present. Last weekend I had the pleasure of being invited to my sister's dinner club, "The Gourmet 12". Every other month they pick a weekend and a theme, each couple brings a dish, food is prepared, wine is poured, and merriment is had by all. The last time I was invited the theme was Argentinian Grill and I managed to get away with not cooking a thing, merely offering advice or a hand when needed. This time however, seeing as how food had already been decided upon I instead offered my services as a bartender, shaking up the perfect cocktail to fit their theme of "France Meets India": rangpur lime-infused gin and homemade curried sour mix topped with a mango-rose foam, aka "The Bollywood". I then paired this with an amuse bouche of fresh strawberry topped with honey and toasted almonds. Once everyone had their libations in hand it was time to start the real cooking. First up was a seared foie gras crostini topped with pomegranate seeds and a drizzle of 25 year balsamic vinegar. The crunch of the pomegranate seeds and the fruit-forward acidity of the vinegar balanced flawlessly with the rich, sweet duck liver. From there the kitchen quickly filled with people cooking, drinking, and munching on foie gras and strawberries. The entree for the evening was a coriander-crusted duck breast with a red wine and mango chutney reduction. Accompanying this was a plethora of side dishes from charred broccoli to cucumber cilantro salad, crushed fingerling potatoes, even an Indian tofu scramble. The final result was a spread worthy of even the most discerning gourmand.

Coriander-Crusted Duck Breasts with
Red Wine and Mango Chutney Reduction


Duck Breasts
  • 2 Tbsp coriander seeds
  • 2 ea 1 lb duck breasts
  • salt and pepper to taste
Sauce
  • 3/4 cup red wine
  • 1 tsp whole grain mustard
  • 3 Tbsp prepared mango chutney
  • 1/2 tsp orange zest
  • 2tsp orange juice
In a large skillet, toast the coriander seeds over medium high heat until fragrant, about 1-2 minutes. Let cool completely, transfer to a spice grinder, and grind to a powder.

In a saucepan over medium-high heat reduce red wine and orange juice by half, then add mustard, chutney, and orange zest and stir together. Turn heat to low and keep warm until ready to serve, stiring occasionally.
 
Score the duck skin in a cross-hatch pattern and season with coriander, salt, and pepper. Heat a skillet on medium-high. Add the duck, skin side down, and cook until the skin is browned and crisp, about 5 minutes. Turn the breasts skin side up and cook until medium-rare, 4 minutes longer. Remove duck from pan and let rest for 5 minutes. To serve, thinly slice the duck crosswise and drizzle with sauce.

Saturday, January 9, 2010

"I don't like scallops..."

"I don't like scallops." she said. "They taste like fish-flavored gum." I knew exactly what she was talking about as she went on to tell me her previous experiences ordering scallops at various restaurants. I do believe it's one of the highest culinary sins to serve someone a fishy, rubbery, overcooked scallop, especially when that person is paying restaurant prices. The worst part, however, was not that she had eaten so many poorly executed scallops, but that she had never actually tasted a properly prepared one. They shouldn't be fishy; a good scallop should smell fresh like the ocean. Nor should they be rubbery; this is what happens when these delicate bivalves get overcooked. At restaurants often the culprit is not the preparation of the scallop, but rather the time it spends under the heat lamp once prepared. So the more I thought about this the more it began to eat away at me. Finally, when I simply couldn't stand it any longer, I insisted that she join me for a Saturday lunch over at my place so that I could remedy this epicurean tragedy.

Seared Scallops and Fried Artichoke on Green Salad


Dressing
  • 2 Tbsp prepared sun-dried tomato pesto
  • 1/4 cup light olive oil
  • 1/4 cup red wine vinegar
  • 1/2 tsp Dijon mustard
  • 1/2 tsp granulated sugar
  • Salt and pepper to taste
 Fried Artichokes
  •  Vegetable oil for frying
  • 1 jar marinated artichoke hearts
  • 1/2 cup all-purpose flour
  • 2 eggs, beaten
  • 1 heaping cup fresh breadcrumbs (you may substitute panko)
Scallops
  • 7 ea large scallops
  • Salt and pepper to taste
  • 3 Tbsp light olive oil or vegetable oil
Salad
  • 6-8 cups baby salad greens
  • 1 cup red onion, thinly sliced
  • 1/4 cup pine nuts, toasted
  • 3 strips cooked bacon, finely chopped
  • finely shredded Parmigiano-Reggiano (for garnish)
Combine all dressing ingredients except oil in a small bowl. Gradually whisk in the oil and season to taste with salt and pepper. Toss scallops with 2 Tbsp of the dressing as well as salt and pepper to taste and set aside. In a large bowl mix together salad ingredients, but do not add dressing until ready to serve.

Heat vegetable oil in a small sauce pan over medium heat until hot. Drain the artichoke hearts and toss with flour to coat, dip into the egg, then remove and press into the breadcrumbs. Fry in small batches until golden brown and crispy, then remove from oil and allow to drain on paper towels. Set aside.

To prepare scallops heat oil in a frying pan over high heat. Just as the oil begins to smoke gently place scallops in pan on their flat, circular sides. Cook for 2 minutes, or until the bottoms have become dark and well caramelized, then flip each scallop and cook for another 1-2 minutes (scallops should yeild to a gentle poke and should not feel rubbery to the touch). Once the scallops are finished this dish should be served immediately.

To serve, toss salad with dressing and plate, then top with fried artichokes and seared scallops. Garnish with Parmigiano-Reggiano.

Monday, November 2, 2009

Gone Camping

Let me start by saying that I love Seattle. This city has the kind of pulse that you can't find just anywhere. From time to time, however, it all just gets to be too much; too many people, bright lights, jobs and responsibilities. When that happens there's only one remedy: pack up the truck and go camping.


So let me tell you how my Saturday began. I woke up early and wandered away from the
campground a bit. It was a good morning hike that made for some great photos. Once I'd found my way back to my camp it was time to start cooking. I'd be lying if I told you I got my fire started right away, but after some trying I'd built something hot enough to boil water for coffee. After my first cup of French press the fire had given off enough coals to make some real food. I hadn't bothered to bring measuring cups so there are no recipes. Everything here is done to taste.


Campfire Breakfast Burritos

Breakfast burritos are an awesome camping breakfast. It's a dish I've done many times over an open fire with a cast iron pan, but this time I wanted to up the challenge a bit. Perhaps I was stepping out of my league; I've never made my own flour tortillas at home, let alone over an open fire, but it turned out to work remarkably well. I found this recipe for flour tortillas on the Homesick Texan's blog and discovered that with little effort it could be adapted to work in a camping situation. Once I had a couple tortillas I kept them warm by the fire while I cooked off a few medium diced potatoes, then added onions, bell peppers, mushrooms, and a little jalepeno. When this was finished I stirred in a bit of store-bought salsa and scooped the mixture into my tortillas, then topped it with sour cream and shredded cheese. It was the perfect way to get my day started.

Once I'd cleaned up from breakfast I strolled down to the lake for some more pictures. My timing was perfect as the fog was just rolling off of the water. After that and another short hike it was time for lunch.


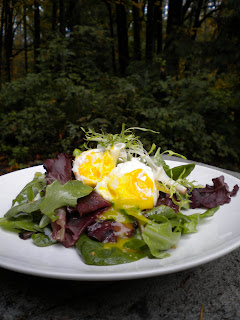
Soft-cooked Egg over Green Salad


This is a trick I'd heard of before, and I've always wanted to try it. Rather than boiling your egg, simply suspend it near some coals using a paper clip and a stick or coat hanger. The cooking time will vary depending on the strength of your fire and position of your coals, but for me I found that cooking the egg for 5 minutes, then turning it and cooking for another 5 resulted in a perfect "soft-cooked" egg like the one pictured. To give you and idea of temperature the egg was hung in a place where I could stand to put my hand for about 3-5 seconds. The salad itself was tossed with some homemade dressing: a simple combination of oil, vinegar, and a small amount of mustard and sugar, seasoned with salt and pepper. You could just as easily bring along your own store-bought brand.


For dinner I brought along some halibut, and from there I tried to use the ingredients I already had. I seasoned the halibut and tossed it in flour, then pan fried it in butter with the last of my mushrooms. It was certainly delicious, but the real star of the day was dessert.


Fried Bannocks with Huckleberry Jam


Using the leftover tortilla dough that I had I pulled off a few pieces and formed them into 1" balls. I set a pan on the fire and added a cup or so of Canola oil for frying. Once this was nice and hot I carefully dropped in my dough balls and cooked each side for a minute or two until they were all a dark golden brown. I then slowly picked them out of the pan, allowing the excess oil to drip off, then set them on a plate of granulated sugar and rolled them around to coat. Served with some huckleberry jam, these were a wonderful departure from the classic s'more we're all so familiar with on camping trips.

With the last of the light for the day I got caught up on some reading. As the sun set I walked back down to the lake to snap a few more pictures, then headed back up to my camp to play some guitar before turning in for the night.

Sunday, October 18, 2009

Rain Hat

It rained all week, then all day Saturday. Finally, it gave us a break on Sunday. When the weather gets like this I always find myself craving a cozy bar and some warm food. That's how I ended up at Hattie's Hat on Friday. A self-proclaimed "dive bar" this place has been in Ballard since the dawn of time. The bar itself is four-times my senior, and the food and decor would definitely be considered "classic", but sometimes it has exactly what I need; Chicken-fried Chicken with Mashed Potatoes and Spinach Casserole, a Pabst, and a Wild Turkey on the rocks. It was just the trick to keep me warm on my walk home in the rain. It hit the spot so well, in fact, that I decided to reconstruct it here as something a little more updated, while still retaining its classic charm. This dish can be easily made for 1-2 people or multiplied to serve more, and is much faster to prepare than the original.


Pan-Fried Pork Chop with Spinach and Crushed Potatoes

Here I used boneless pork chops instead of chicken breast, and only dusted dusted them with flour rather that full-on breading them. The spinach I used was from the farmer's market and was large enought that it had to be cut up, but generally when using store-bought this wont be necessary. Finally, while I've seen the technique before, this is the first time I've prepared potatoes this way. The result is crispy and flavorful, not unlike homefries or hashbrowns.

Crushed Potatoes 
  • 1 small bag baby potatoes, golfball sized
  • 2 Tbsp butter
  • salt and pepper to taste 
Pork Chops 
  • 1 Tbsp Canola oil
  • 2 thin cut boneless pork chops 
  • salt and pepper 
  • 3 Tbsp all-purpose flour 
  • Parmigiano-Reggiano (for garnish)
Sauteed Spinach 
  • 1 small onion, julienned 
  • 2 tsp Dijon mustard 
  • 1/4 cup buttermilk 
  • 1 bunch (or bag) spinach 
  • Salt and pepper to taste 
Place the potatoes in a large saucepan. Add salt generously and cover with water. Bring the water to a boil over medium-high heat. Reduce the heat and cook at a low boil until they are tender enough to slide a knife in easily, aproximately 10 minutes. Drain the potatoes and refrigerate.


Heat canola oil in a large pan over medium-high heat. Measure flour into a shallow dish. Season each pork chop with salt and pepper then lightly coat with flour. Place chops into preheated pan and cook 2-3 minutes per side. When both sides are nicely browned remove chops from pan and cover with foil to keep warm. Return pan to heat and add butter.


At this point the potatoes should be cool enough to handle. On a cutting board gently crush each potato with the bottom of a glass, season liberally and set each gently into the pan. Cook two minutes per side, remove from pan, and add the onions. Allow these to brown and soften, 3 minutes, then stir in mustard and buttermilk. Add spinach and toss to wilt. Portion spinach onto plates, top with crushed potatoes and pork chop, and garnish with large shavings of Parmigiano-Reggiano.

Sunday, October 11, 2009

Berry Bonds

Berries are one of my favorite end-of-the-season ingredients. Growing up, it was always around this time of year that my mother would make us cobbler using fresh picked blackberries from our driveway. I've never even tried to make her recipe myself; it just wouldn't be the same. Nonetheless, I have found a few ways of putting these late summer fruits to good use. I think we've all seen a classic creme brulee topped with fresh seasonal berries, but this recipe takes it to the next level by adding some gently cooked local Tra Zee peaches to the bottom of the ramekin before pouring in the custard. The Tra Zee is a late season peach with an excellet color and delicious flavor; perfect to pair with blackberries and raspberries, which can often still be found this late in the season. In this case, we used golden instead of red raspberries (they looked so good at the market, we just couldn't walk past them), but feel free to use whatever is available and fresh in your area.


Late Season Creme Brulee

  • 4 large egg yolks
  • 4 Tbsp sugar
  • 1/2 tsp vanilla
  • 2 cups heavy cream
  • brown sugar for caramelizing (If available use "Sugar in the Raw")
  • 1 pint fresh local berries

Cook peaches over medium heat in several tablespoons of liquid until soft (we used water for this, but white wine or orange juice would be a great way to incorporate another layer of flavor. If your peaches are especially ripe then this step may be omitted). Spoon peaches into each of four ramekins. Return pan to heat and add cream. In a separate pan combine eggs, sugar, and vanilla. Once cream begins to simmer pour into egg mixture and bring up to medium heat, stirring constantly. Cook until mixture coats the back of a spoon, about 12 minutes. Once mixture has thickened divide between ramekins and place in referigerator to cool (1-2 hours). At this point the custard should be firm to the touch. Set oven to broil and sprinkle custard-filled ramekins with brown sugar. Broil for 2-3 minutes, or until sugar has completely melted and caramelized. Remove from heat, alow caramel to harden, top with fresh berries and serve.


Homemade Blackberry Liqueur

On the other hand if you grow your own fruit and find yourself wondering what to do with all of it, or if you just want to hang on to the flavors of the season throughout the winter, a simple liqueur like this one is just the trick. It will last all through this winter and well into next one, and it serves as an excellent reminder of warmer days on those chilly evenings that are fast approaching. Simply take about a pint of ripe fruit (I used blackberries, but feel free to use anything thats in season and ripe.) and combine with one bottle of the liquor of your choice. Let sit in a cool, dark place for 2-3 weeks, strain through a cheesecloth, and add simple syrup (1 part sugar to 1 part water, heated to dissolve) to taste; somewhere around a cup or two. Allow this to mellow for several months.

I've used Southern Comfort here because its sweeter and has the caramel and orange notes that remind me of the holidays. You could use just about any type of whiskey, but not scotch. Rum will give you a slightly sweeter finished product. Vodka will give you a much cleaner berry flavor, but without as much complexity. If you want an especially sweet cordial you could start with everclear and add some extra fruit. This will allow you to add twice as much simple syrup later with out letting the alcohol content drop to low. I've been fairly vague about measurements because its all a matter of taste, and half the fun is experimenting with different combinations. Try adding some other flavors to the mix before straining: cloves, whole alspice, star anise, whole almond, ginger, orange peel, etc.

Monday, October 5, 2009

End of the Season

It's official, fall is finally upon us. After last week's rain here in Seattle there's no denying it and, while some may be sad to see the end of our Indian summer, I've been ready. Fall brings with it an entirely different kind of cooking; that heart-warming food that reminds us all of home.

I'm in Bellevue this weekend and, as with many places, the farmer's market is quickly coming to a close for the year. Taking andvantage of what little time is left I decide to pick up some local squash. These firm, starchy fruits of autumn lend themselves to the slow-cooking methods that, for me, represent the season. Toss in some chicken thighs, onion, and herbs and you have a meal to take the chill off even the coldest of days.


Braised Chicken Thighs and Squash with Sauteed Mustard Greens:


We used three types of squash here; buttercup, delicata, and carnival, each with slightly different firmness and, therefore, different cooking times. In the case of this recipe, however, cooking them all together and allowing some squash to become a little "overcooked" while others retain their shape lends body to the braising liquid and only serves to make the finished product even more delicious


Chicken Thighs and Squash
  • 4 Tbsp butter, unsalted
  • 2 Tbsp rosemary, chopped
  • 2 Tbsp sage, chopped
  • 1 medium onion, diced
  • 4 cups seasonal squash, peeled and cut into 1/2 in. pieces
  • 1 Tbsp cider vinegar
  • 1 cup chicken broth
  • 1/4 cup heavy cream
  • 1 Tbsp canola oil
  • 4 bone-in chicken thighs
  • salt and pepper to taste
Mustard Greens
  • 1 Tbsp butter, unsalted
  • 2 Tbsp minced garlic
  • 1 tsp red pepper flakes
  • 1 bunch Mustard greens, stems removed
  • salt and pepper to taste
  • Melt 4 Tbsp butter in a pot over medium-high heat. Add herbs and saute briefly to release aroma (aprrox. 1 minute). Add onion and cook until lightly browned, then add squash and toss to coat with butter and herbs, cooking for 4-6 minutes. Deglaze with cider vinegar, scraping the bottom of the pot to release any browned bits, then add chicken broth and cream. Cover and reduce heat to medium low.
    In a large saute pan on medium high heat add 1 Tbsp canola oil. While the oil is heating season chicken thighs liberally with salt and pepper. Sear thighs on each side (skin side first) and add to the pot of squash, forcing them to the bottom of the pot. Replace the lid and braise for 20-30 minutes, or until chicken and squash are cooked through.
    When the chicken and squash is finshed braising melt 1 Tbsp butter in a saute pan over medium-high heat. Add garlic and red pepper flakes and cook briefly (1-2 minutes), then add mustard greens and toss gently to coat with melted butter. Cook for about 2 more minutes, or until greens are gently wilted. Remove from heat and portion greens onto each plate. Remove chicken thighs from pot, plate, and top each with cooked squash and brasing liquid.

Sunday, September 27, 2009

Market Dish for Under $20

For me, there's no better way to spend a Sunday morning than perusing the Ballard farmer's market. It's a great way to support the local growers and, inevitably, inspires me to create a fresh, organic, seasonal dish. To up the challenge a bit i bring with me a single $20 bill and see how far I can make it go.


Lobster mushrooms have a relatively short season, but a terrific flavor and texture. Seeing them here took me in the direction of a tomato-mushroom ragout, one of my favorite ways of preparing wild mushrooms. I backed these up with some chantrelles, which have a notably longer season and a more familiar flavor.

Wild Mushrooms: $5


Realizing that I wanted the vessel for my ragout to be a thick slice of toasted rustic bread, I decided to pick up some tangy red pepper crusted goat cheese to smear on my toasts, contrasting the sweet-savory ragout.

Chevre Goat Cheese: $6


On my way to the tomatoes I came across these sweet pimiento peppers. I couldn't help but pick one up, knowing that they would help to reinforce the sweetness of the ragout and round out the flavor.

Pimiento Pepper: $1


Once I finally got around to picking up the tomato and onion I would need, I noticed a large crate of lemon cucumbers. Slightly larger than a golfball, this variety of cucumber is sweeter and milder than its green cousin. While I haven't had many opportunities to work with these, I have found it does suprisingly well when added to warm dishes, though itself shouldn't necessarily be cooked. I bought two; one to play with now, and one to play with later.

Tomato: $.75
Onion: $.75
Lemon Cucumbers: $1


So with my last $5.50 I figured it was time to get the bread and get out of there. Tall Grass Bakery was just a few stalls down, and their artisanal breads make a meal feel like it came from the market. I picked out a big crusty loaf of sourdough, paid, and put my one remaining quarter in my pocket before heading home to the kitchen.

Baker Street Sourdough Bread: $5.25


Tomato-Mushroom Ragout on Rustic Sourdough:

Ragout
  • 3 Tbsp unsalted butter
  • 1 small onion, medium dice
  • 1 pimiento (or small red bell) pepper, medium dice
  • 1 medium tomato, large dice
  • 2 cups wild mushrooms
  • 2 sprigs fresh thyme
  • 2 sprigs fresh rosemary
  • salt and pepper to taste
Sourdough Toasts
  • 6-8 thick slices rustic sourdough bread
  • melted butter or oil
  • fleur de sel
  • chevre (or any soft, creamy cheese)
Garnish
  • lemon cucumbers (or green cucumbers if not available), fine julienne
Preheat oven to 450 degrees. Melt butter in an oven-safe pan (cast iron or steel, no Teflon) over medium-high heat. Add onions and cook until translucent, then add peppers and stir to combine. Cook for 2 minutes, then place whole herb sprigs into the pan (these will be removed later). Once the herbs begin to give off their aroma (2-3 minutes) add the tomatoes, sprinkle with salt and cook briefly to allow the them to release their juice. Next, add the wild mushrooms, stir, and place pan in the oven for approximately 20 minutes, or until mushrooms are cooked thoroughly.

While the ragout is cooking spread each slice of bread with oil or butter and sprinkle lightly with salt, then place on a sheet pan. Once the ragout is finished discard the herb sprigs, switch the oven to broil and move ragout pan to the very bottom rack of the oven to keep warm. Toast the bread slices on the top rack of the oven until golden brown, then remove from heat and spread each slice with chevre.
Arrange toasts on a plate and load each one generously with ragout. Finish by topping with julienned cucumber and serve.
See the rest of my photos from the market